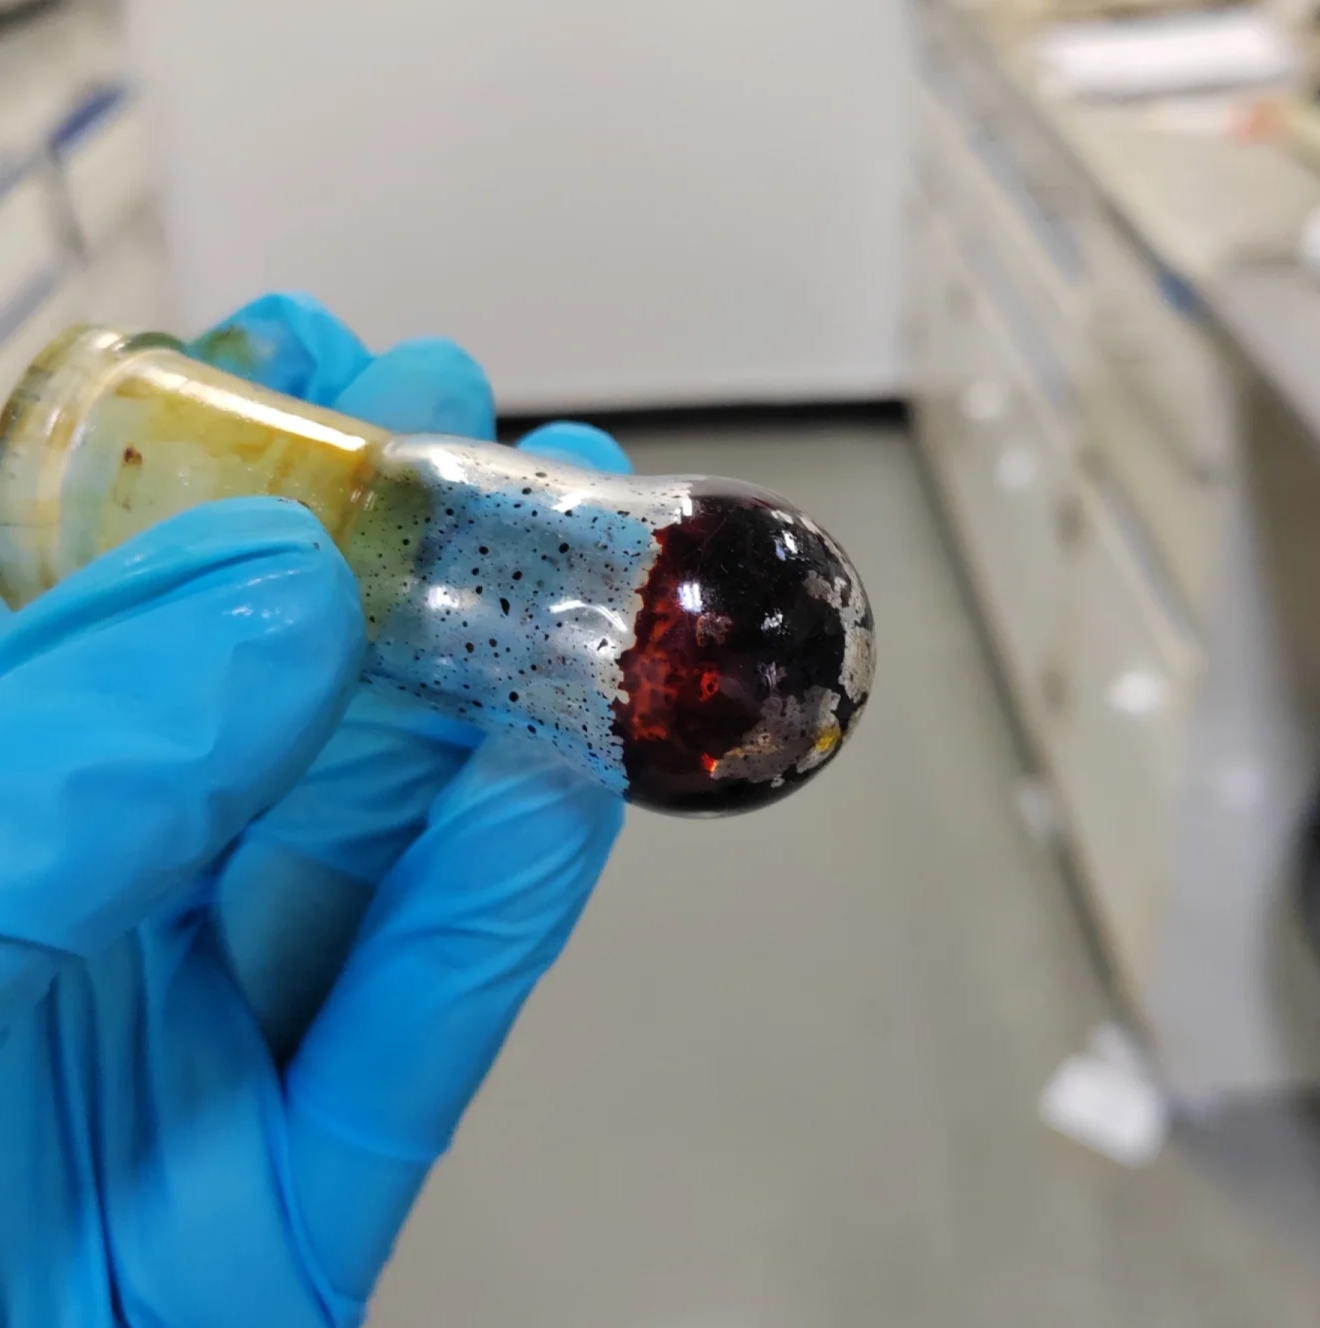
It is late, the rotovap is still spinning, and you are waiting for the satisfying end to a long day. Then the last of the solvent disappears, and instead of a clean residue, you find a black smear, a brown tar, or a hard transparent mass fused to the glass. The first instinct is usually to swear quietly and rush the flask to the wash area.
In many cases, that is exactly the wrong first move.
A charred rotovap flask is not just a cleaning problem. It is often the best physical record of how the final stage of concentration went wrong. The color, texture, and position of the residue can tell you whether you were dealing with concentration-driven side reactions, local overheating, oxidation during the tail end, or some combination of all three.
Before you wash the flask, give it five minutes of attention. That short pause can be more useful than guessing later.
Before You Wash the Flask
- Clear, glassy, hard residue often points to polymerization or cross-linking.
- Black, brittle, charred film is more consistent with local overheating or thermal decomposition.
- Residue concentrated along a tide mark often suggests trouble in the thin-film zone rather than uniform bulk heating.
- A sudden darkening near the end commonly means the system became less forgiving as solvent volume collapsed.
- A problem that becomes worse during cooling can indicate oxidation or air exposure in the final stage.
Quick Triage: What the Residue May Be Telling You
| What you see | What it often suggests | What to do first |
|---|---|---|
| Clear or amber hard mass stuck to the glass | Polymerization, cross-linking, or concentration-driven side reaction | Stop heating immediately and see whether a tiny portion can still be dissolved for analysis |
| Black, brittle film or localized char | Local overheating, hot spots, or thermal cracking | Record where the char started before cleaning anything |
| Brown sticky resin or tar | Tail-end concentration made side reactions faster, but the material may not be fully destroyed | Do not force the flask to dryness; consider whether a small amount of suitable solvent can recover part of the residue |
| Color changes rapidly in the last few minutes | The chemistry changed as solvent disappeared and concentration rose sharply | Use residual bath warmth to finish gently rather than driving hard to complete dryness |
| Damage seems worse after cooling or after venting | Possible oxidation or air ingress during the final stage | Review whether the system needed inert gas protection near the end |
Why the Last Few Minutes Are Often the Most Dangerous
Many rotovap failures happen right at the point when the operator thinks the difficult part is over. The flask is almost dry, the bulk solvent is gone, and it feels as though the job is simply to remove the last traces. In practice, that final stage is often the least forgiving part of the whole concentration.
1) Concentration changes the chemistry
While your product is still diluted in a large volume of solvent, many undesirable reactions remain relatively slow. Once that solvent is stripped away, the chemical environment changes. Molecules are forced closer together. Local concentration rises. Reactions that were previously minor, such as oligomerization, polymerization, or self-condensation, can become much more competitive.
This is especially important for compounds that are heat-sensitive, acid-sensitive, base-sensitive, air-sensitive, or simply prone to reacting with themselves once they become too concentrated. A residue that looks fine at 50 mL can become unstable at 5 mL.
2) The thin film at the end is not a gentle condition
The tail end of rotary evaporation often looks calm from the outside, but the sample may no longer be protected by the same heat-buffering conditions that existed earlier. When the liquid becomes a thin film, the system loses some of the thermal moderation provided by a larger liquid volume. Evaporation also removes less heat once there is very little volatile material left.
In other words, the water bath setting may not have changed, but the sample can still experience harsher local conditions than it did twenty minutes earlier. That is one reason why the final residue may darken suddenly, stick to the wall, or begin to decompose in a narrow band rather than uniformly.
Practical takeaway: the last few milliliters are not always the safest part of the evaporation. They are often the point where the system becomes least buffered against chemical and thermal stress.
A 5-Minute Diagnostic Routine Before Cleanup
You do not need an elaborate forensic workflow. A short, consistent routine is usually enough to preserve the most useful clues.
Step 1 — Photograph the flask
Take a quick photo before touching anything. Capture the overall distribution, the darkest region, and any visible tide mark. If you later need to troubleshoot with a colleague, that image is often far more useful than memory.
Step 2 — Look at the texture, not just the color
Color alone can mislead. A black residue may indeed reflect thermal damage, but a glassy amber or colorless hard coating can be just as serious if the sample has polymerized. Ask whether the material looks brittle, rubbery, glassy, granular, or tar-like. The texture often gives a better clue than the exact shade.

Step 3 — Note where the damage started
Position matters. If the residue forms as a ring or band, that often points to trouble in the thin-film zone. If the worst charring is concentrated in one lower area, local hot spots or uneven exposure may be part of the story. If the whole flask is uniformly affected, the material itself may simply have been unable to tolerate the final conditions.
Step 4 — Test whether a tiny amount can still be analyzed
If possible, try to recover a very small portion with a suitable solvent. Even partial solubility can be useful. A quick NMR, IR, or LC-MS run on a fragment may tell you whether the molecular core survived, whether the sample oxidized, or whether a polymeric byproduct took over.
Step 5 — Only then decide whether this is just a cleaning problem
Sometimes the answer really is simple: the compound could not tolerate the final strip. But often the residue still tells you something actionable about concentration, heating, flask choice, gas protection, or stop point. If you wash first, that information is gone.
The Signals Most People Miss
Many operators watch the digital controls but not the behavior of the flask itself. In the final stage, that is a mistake. The display may tell you the bath temperature and approximate vacuum conditions, but it does not always tell you how stressed the residue has become.
One useful habit is to watch the condensation pattern. When the condensation line retreats and the system no longer behaves as if there is enough volatile material to sustain smooth evaporation, that is often the moment to ease off rather than push harder. For a heat-sensitive residue, the right move is often to stop active driving and let residual warmth do the last bit of work.
Warning signs near the end of a rotovap run
- The condensation pattern begins to retreat noticeably.
- The residue darkens quickly over a short time.
- The sample starts to cling to the wall as a fixed film instead of redistributing smoothly.
- The last liquid volume becomes unusually viscous.
- You find yourself trying to “push through” the last bit rather than deciding whether it should be taken to full dryness at all.
Prevention at the Bench
Not every damaged residue can be prevented, because some compounds are inherently unstable and some reaction mixtures still contain reactive impurities. But a surprising number of rotovap failures come from the same preventable habits.
Do not assume “almost dry” means “safe to finish aggressively”
For many sensitive materials, the last stage should be gentler, not harsher. If the residue is already becoming viscous or dark, it is often wiser to stop active heating, reduce the stress on the sample, or reconsider whether complete dryness is even necessary at that point.
Use a chaser solvent when appropriate
In some cases, adding a small amount of a more suitable solvent can reduce viscosity, prevent a concentrated reactive film from forming, and help remove residual volatile material under milder conditions. This is not a universal fix, but it can be a useful option when the residue is becoming dangerously concentrated.
Think about oxygen exposure during the tail end
Some residues are most vulnerable after most of the solvent is gone. If a product is air-sensitive, the final stage may need more attention to inert handling, not less. A weak inert gas bleed or better control of the venting step may matter, especially for easily oxidized materials.
Flask shape can matter more than people think
For very small final volumes, geometry affects how the residue spreads. A standard round-bottom flask can leave a tiny amount of material distributed as a relatively thin film over a broader area. In some recovery situations, a pear-shaped flask helps keep the remaining liquid deeper and more pooled. That does not magically prevent decomposition, but it can reduce how quickly the last residue turns into an exposed thin film.
This is most useful when you already know the material is sensitive and you expect only a small amount of final residue. It is not a cure-all, but it can improve the odds.
Final-Strip Checklist
- Do not automatically drive a heat-sensitive sample to complete dryness.
- Watch the behavior of the residue, not just the bath setting.
- Treat rapid darkening or rising viscosity as a warning, not a challenge.
- Use residual warmth to finish gently when appropriate.
- Consider a chaser solvent if the residue is becoming too concentrated too quickly.
- For air-sensitive materials, think about protection during the tail end and venting step.
- For very small sensitive residues, choose flask geometry deliberately.
- Before cleaning, record the residue’s color, texture, and location.
A failed rotovap run is frustrating, but it is rarely meaningless. The residue left behind is often the closest thing you will get to a failure report written by the experiment itself.
Read it before you wash it.